I am not dead I just have not learned how to sew laying down... :( About a month ago, I suffered an injury to my back that never went away. This past weekend while at mobicon the combination of performing and teaching made the injury worse. I went to a doctor, they think its muscular luckily, I just need to take it easy. No more dancing. Sigh. Tho a theory has been proposed I have injured a hip/butt muscle that is pulling on my spine leading to the lower back pain. And after reingniting this injury, my bum hurts and so does my back.
The plus side of this is I am not allowed to lean over. I have to squat to pick something up. I am getting thighs of steel! :)
I am hoping to get some blogs done by this weekend. I finished 2 dresses. Started another one. And pulling out the seams of a pair of capri pants that will make a cute skirt! I would like to get them all posted so I can join several link parties. I got nothing online this week. I am so sad!
Here's to my back healing and me getting some sewing done! :)
XOXOXO,
Lauren
Wednesday, May 25, 2011
Monday, May 16, 2011
Laura Ashley Dress
This refashion solely came to be be reading another refashioners blog and seeing what she did. Once I read this, I instantly knew I had to do it to this dress. I was so stuck! Thank you so much for getting me unstuck with this garment.
First I want to give total props to Erica, since I followed exactly what she did. Here is her initial post on the refashion co-op blog here and here is her actual blog that gives a better detail. She does amazing refashions! :)
Oh yeah and I took the cat option for this refashion. Except my cat is all grey (and lurking in the background occasionally with laser eyes, she shows up in 3 pictures, can you find them??). You would understand if you read her blog. :)
First, the Laura Ashley fabric dress. Its not actually Laura Ashley but it reminded me of that. Usually I am not a fan. But again I was determined to make it pretty (just like the green monster).
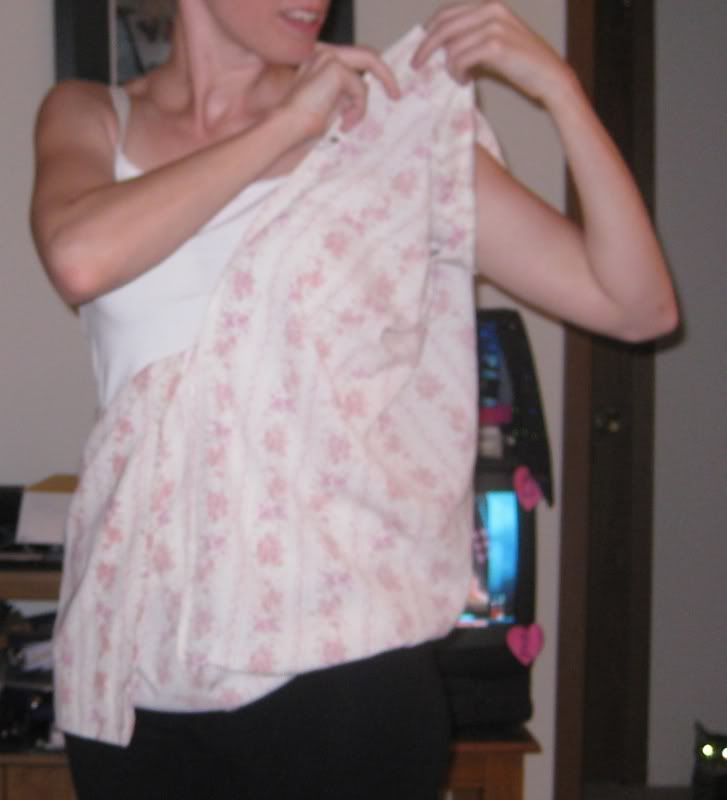
What I first needed to do was cut off the bodice.
Then put the dress back on. Placing the slit down the center of my body. This is going to become the V-neck portion of the top.
Pull it up, now turning it inside out.
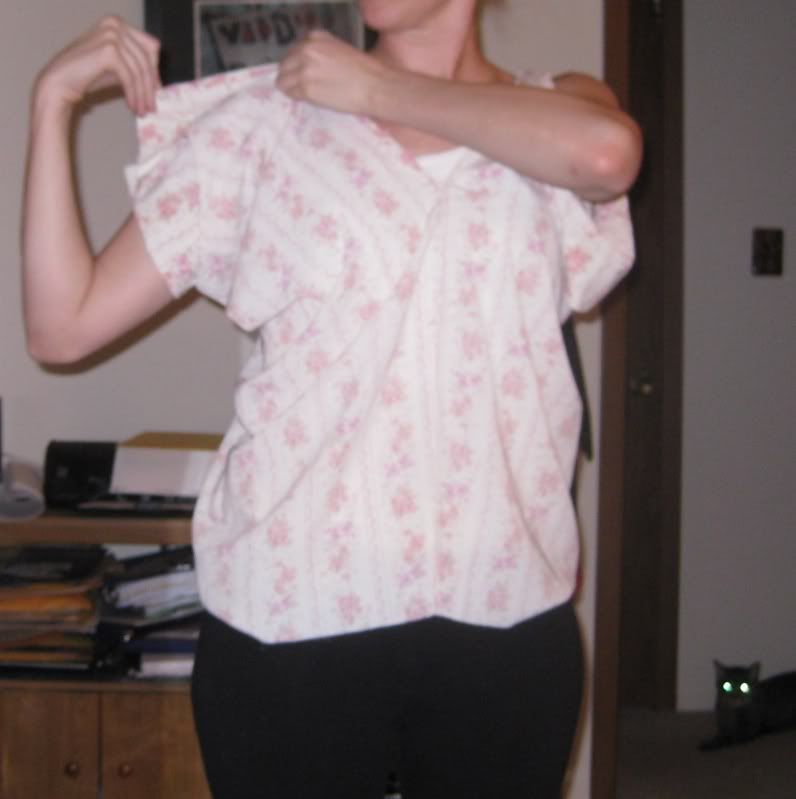
Pin at one shoulder (safety pin is awesome b/c you may have to readjust).
Pin at the other shoulder.
You are actually pinning in the slit of the dress and not at the bottom part of the garment. Also, my slit wasn't long enough to give me enough room so I had to take out the seam ripper and pull out some stitches to make the shirt work for me.
Next, sew along the top part (where your safety pins start to the end). And almost done.
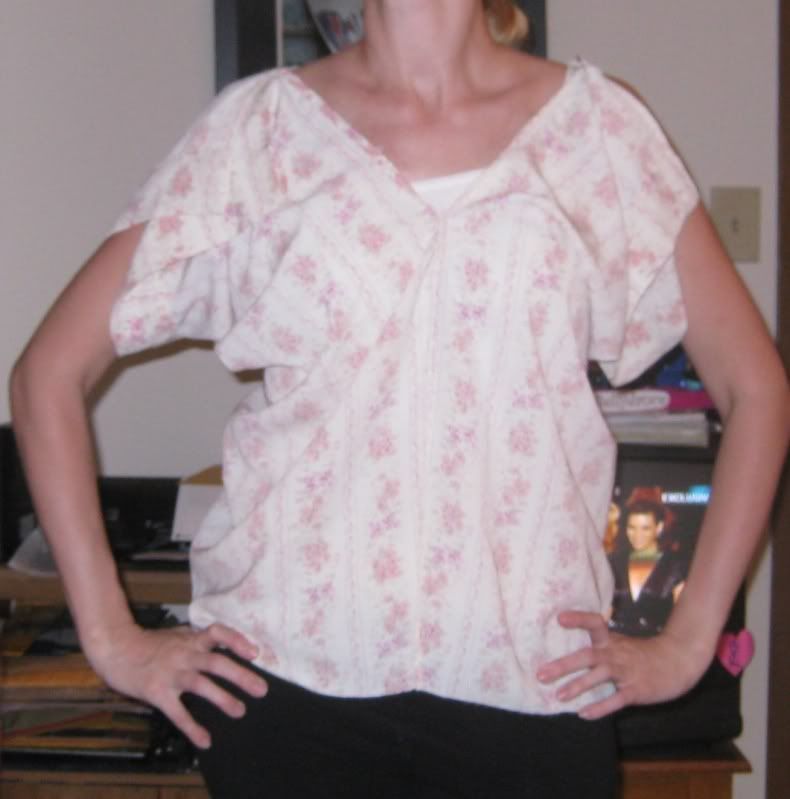
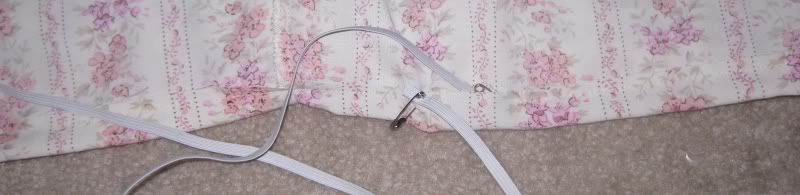
Now I need a bottom. So I folded it up and created a casing for elastic. And added elastic. Close it up. Done!!
The end product...
This was easy peasy! I wish I had a larger skirt to get more room for my torso (so it would be more billowy) but for the easiness of this project I can not be happier! :)
Thank you so much Erica for inspiring me. :)
XOXOXO,
Lauren
First I want to give total props to Erica, since I followed exactly what she did. Here is her initial post on the refashion co-op blog here and here is her actual blog that gives a better detail. She does amazing refashions! :)
Oh yeah and I took the cat option for this refashion. Except my cat is all grey (and lurking in the background occasionally with laser eyes, she shows up in 3 pictures, can you find them??). You would understand if you read her blog. :)
First, the Laura Ashley fabric dress. Its not actually Laura Ashley but it reminded me of that. Usually I am not a fan. But again I was determined to make it pretty (just like the green monster).

What I first needed to do was cut off the bodice.
Then put the dress back on. Placing the slit down the center of my body. This is going to become the V-neck portion of the top.
Pull it up, now turning it inside out.
Pin at one shoulder (safety pin is awesome b/c you may have to readjust).
Pin at the other shoulder.
You are actually pinning in the slit of the dress and not at the bottom part of the garment. Also, my slit wasn't long enough to give me enough room so I had to take out the seam ripper and pull out some stitches to make the shirt work for me.
Next, sew along the top part (where your safety pins start to the end). And almost done.
Now I need a bottom. So I folded it up and created a casing for elastic. And added elastic. Close it up. Done!!
The end product...
This was easy peasy! I wish I had a larger skirt to get more room for my torso (so it would be more billowy) but for the easiness of this project I can not be happier! :)
Thank you so much Erica for inspiring me. :)
XOXOXO,
Lauren
Fabric Points Tally May
Just realized I have not kept track of my fabric points! So for my sake I need to update!
Last post was 28 but I have done more.
I got up to 35 with
+1 for giving fabric to laura when I gave her my sewing machine
+1 for giving Sonja fabric for her roman shade
+1 for the heart pin
+3 for the workboard projects (which I use all the time!)
+1 gold brocade skirt
=7 points :) so I got to 35.
Then What I forgot to add was
+2 for giving sonja fabric (2 different mint green/sage green)
+1 Laura fabric that was kid looking that just wouldn't work for me.
+ 15 for judy's bibs and burp cloths
+1 for the pink butterfly kimono shirt
= +19
Yeah!! So 35 + 19 = 54
It is almost the middle of the year and I am halfway done with my goal of a 100! So I am making good progress!
Sunday, May 15, 2011
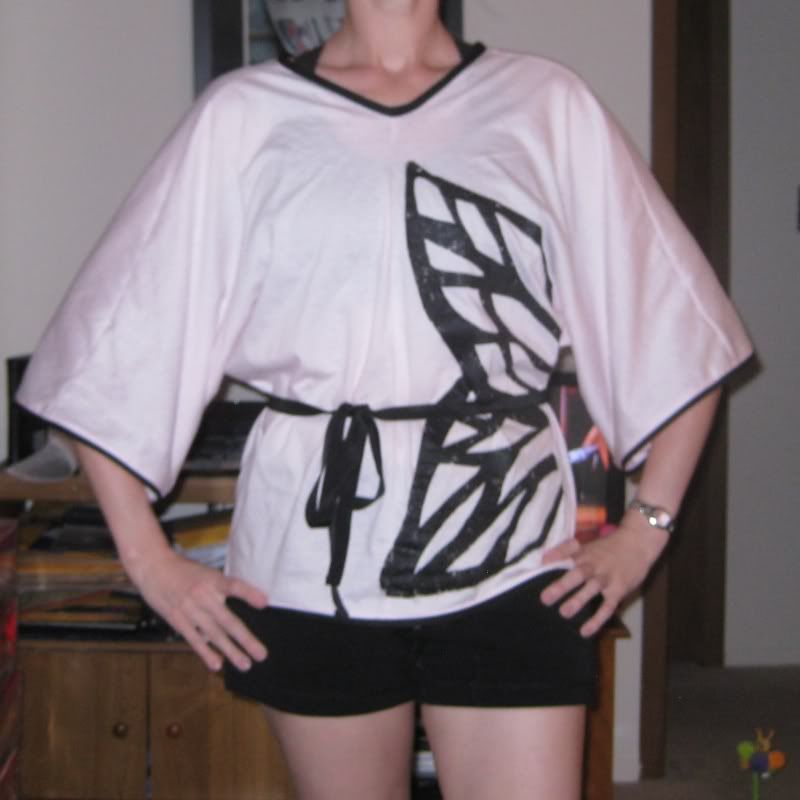
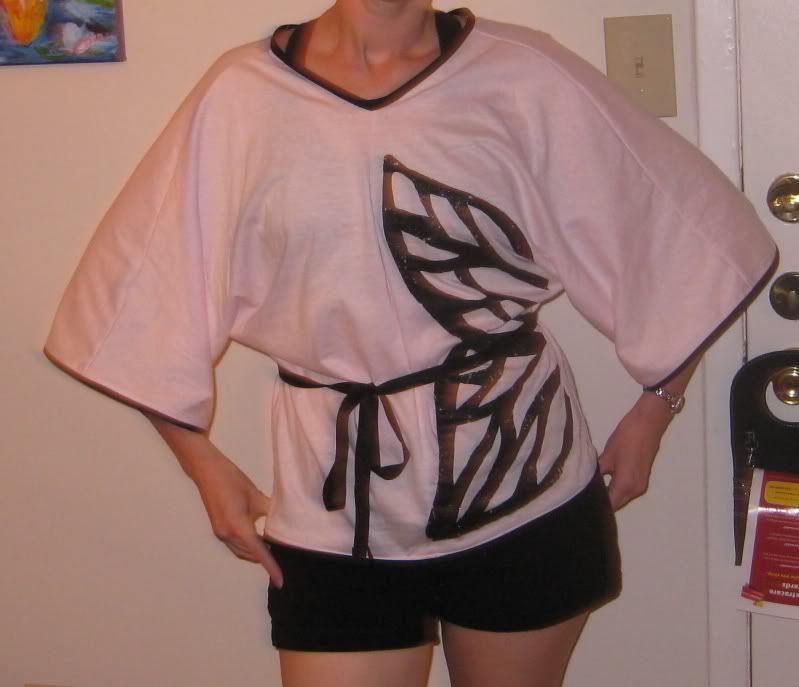
Butterfly Kimono Top
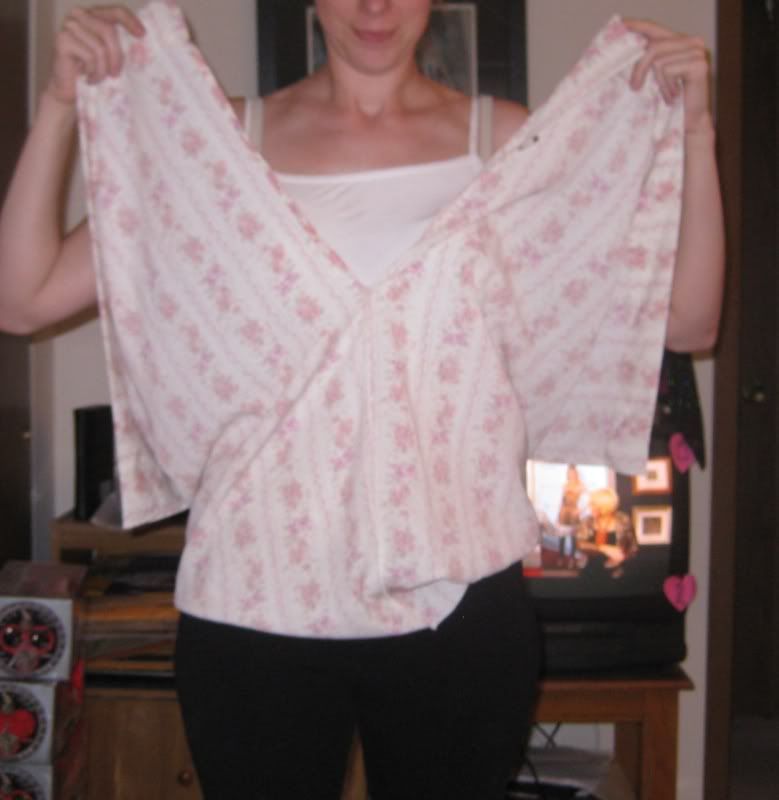
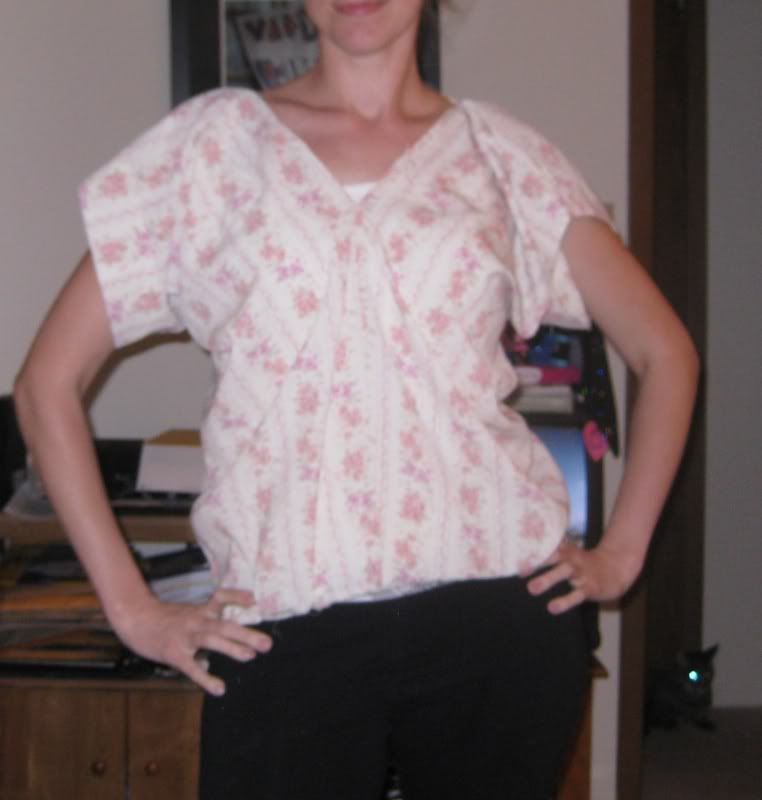
I dreamt of this top one day and I just couldn't get it out of my head. Luckily this week's iron craft challenge was the tee shirt challenge. Iron craft project #20!!
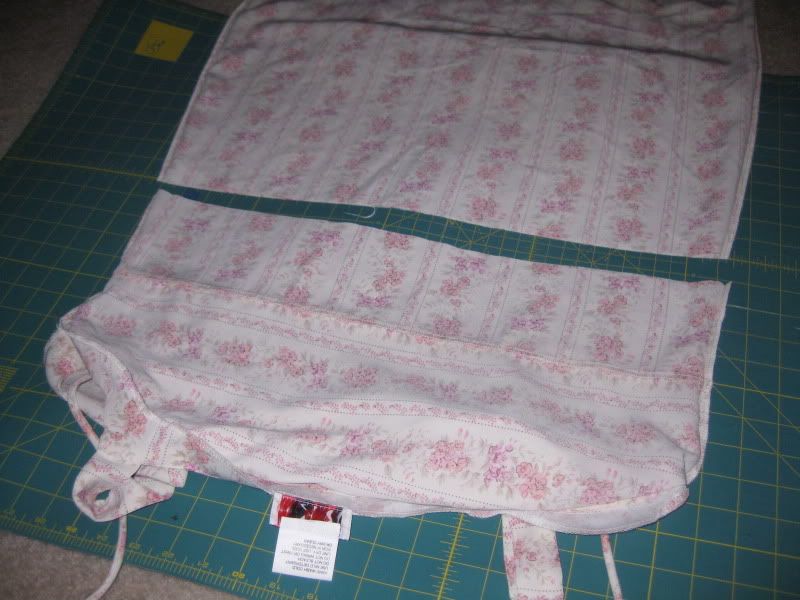
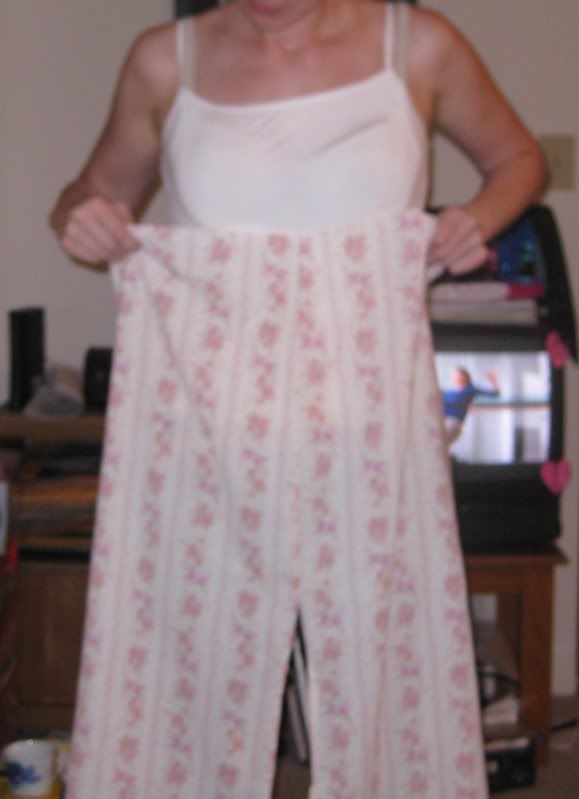
First I began this project with making a kimono-style top. I had this light pink fabric which was a light-weight jersey knit fabric in my stash (so yay for earning a fabric point!).
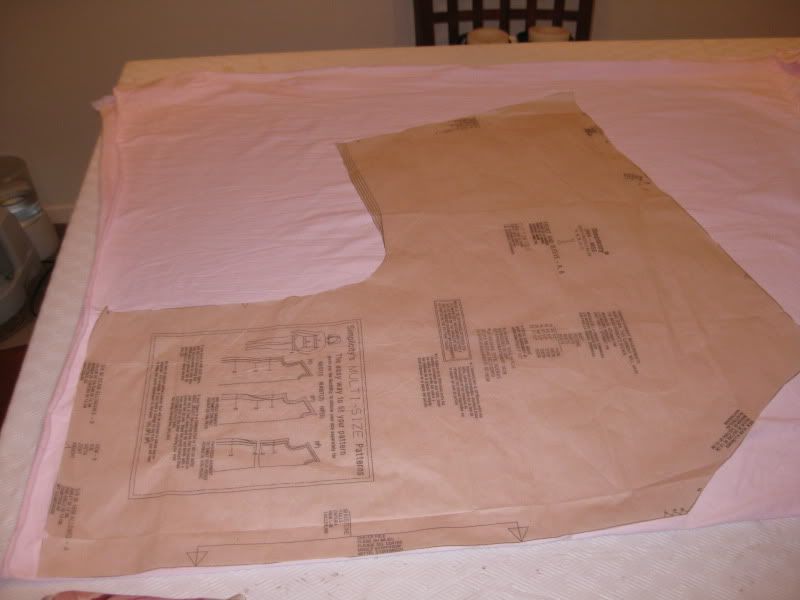
Here goes me sewing something from scratch! I used Simplicity's Pattern # 2804 View A for my template.
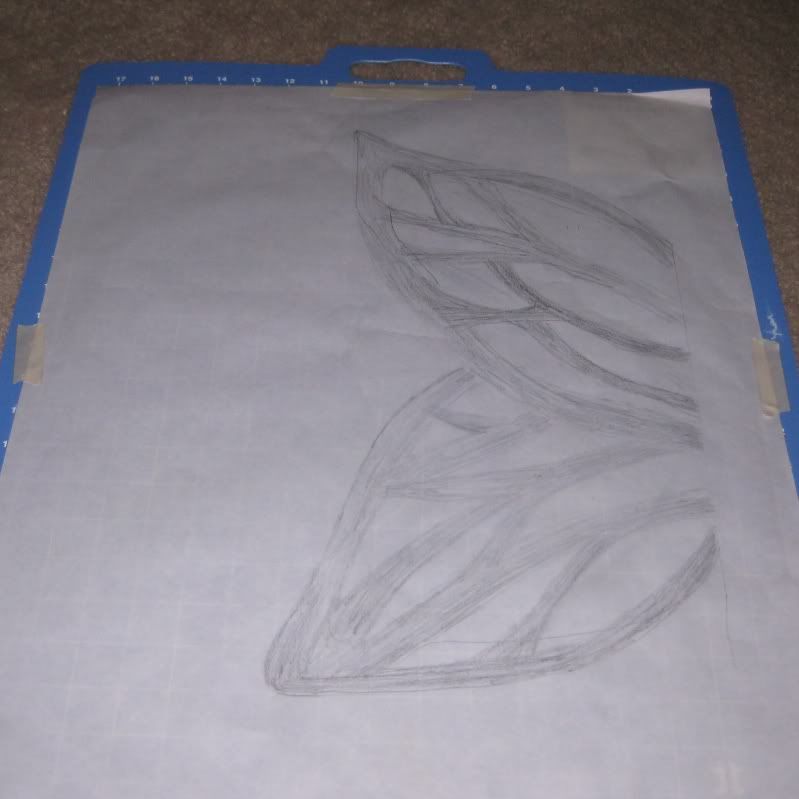
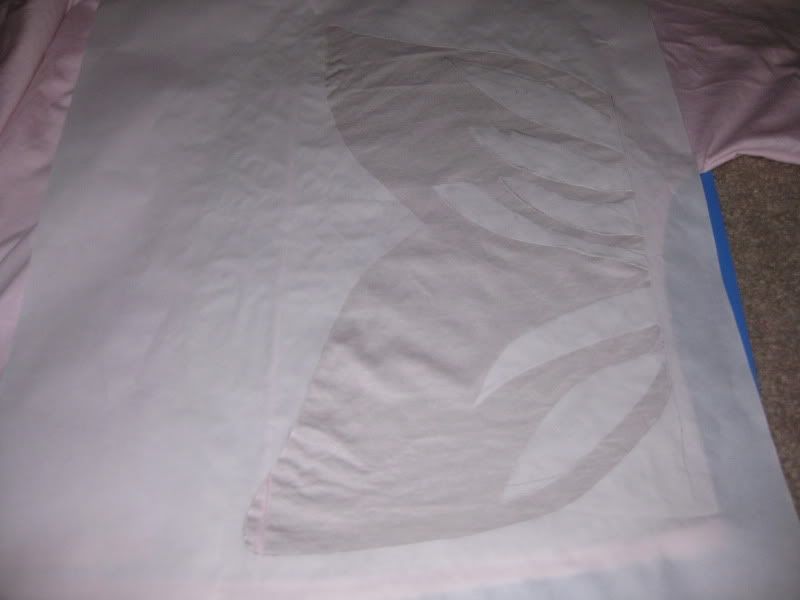
Then to make my butterfly I sat down and sketched half a butterfly. This was actually sketched by me, I did not copy any particular photo or image. I drew it myself, that right there is amazing since I do not consider myself much of an artist.
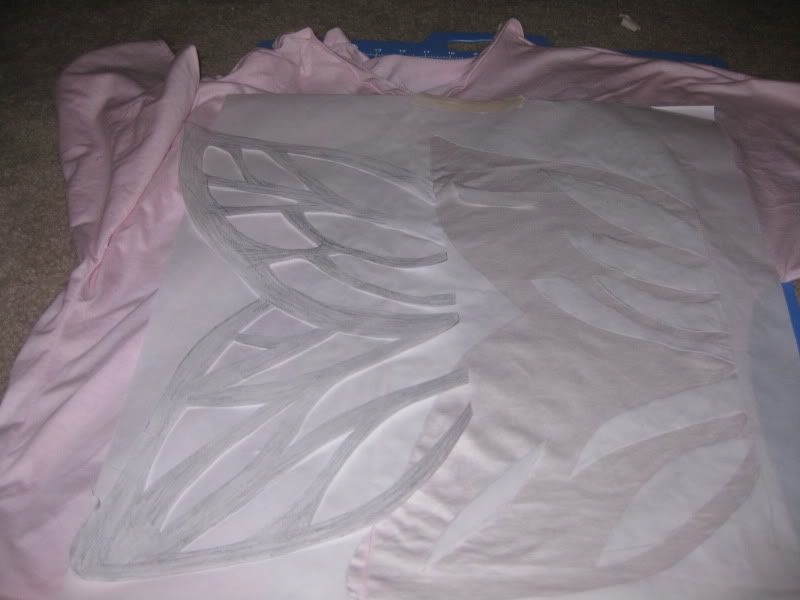
I then cut out the butterfly using an exacto knife on my rotary cutting board. Now What I forgot was some of the inserts, I actually wanted to keep but got cut out when I prepped the stencil, so I had to re add them back in so I used the cut out portion to line everything up.
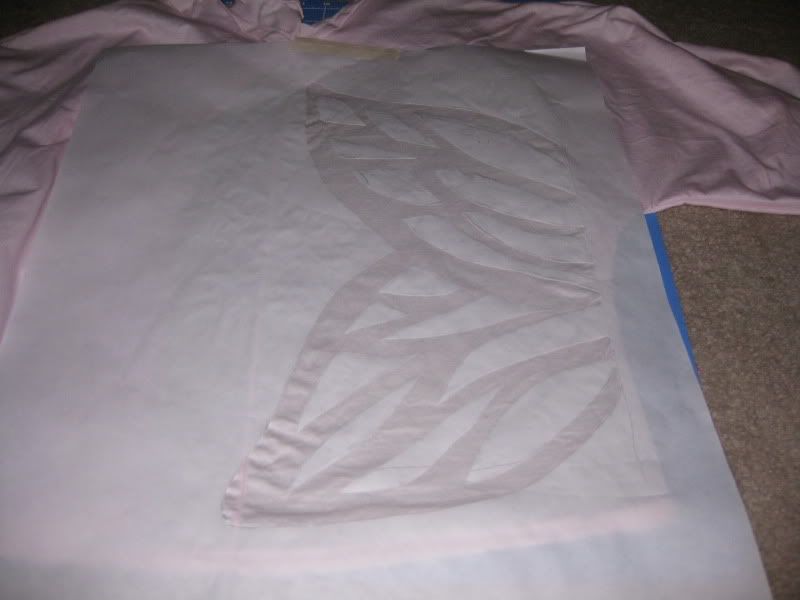
Now to simply keep the stencil in place just add the iron (no steam mode) and lightly touch the stencil. It immediately sticks! This is how I got the inner portions of the stencil to stay. :)
Now we are ready for paint! In one of the previous photos I added a thick piece of paper (I used a file folder) between the shirt layers so the paint wouldn't go through. Forgot to mention that earlier. I used a sponge to apply the paint, I wanted holes in the butterfly. I didn't want it to be too perfect. :)
Let the paint dry and remove the stencil.
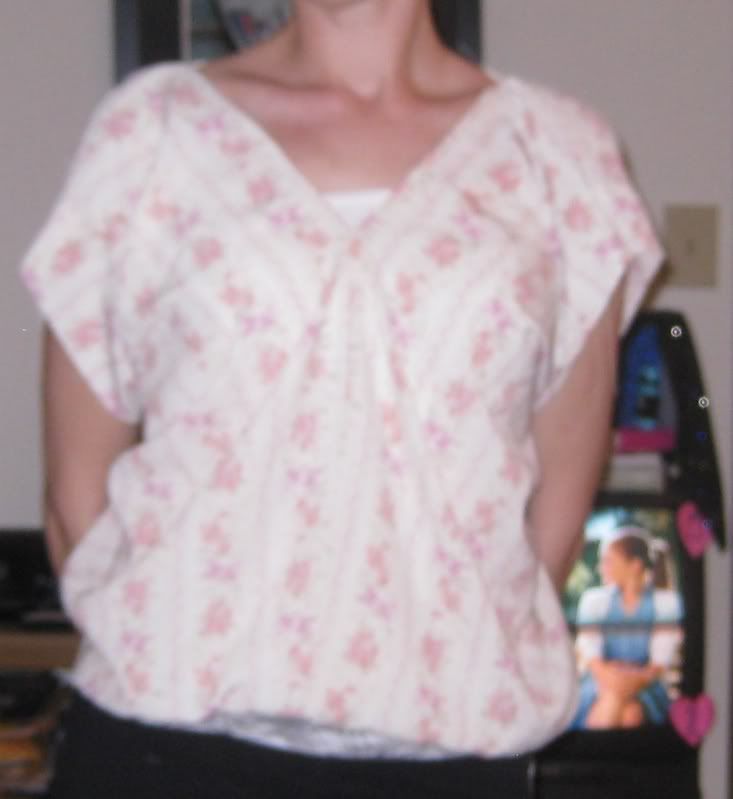
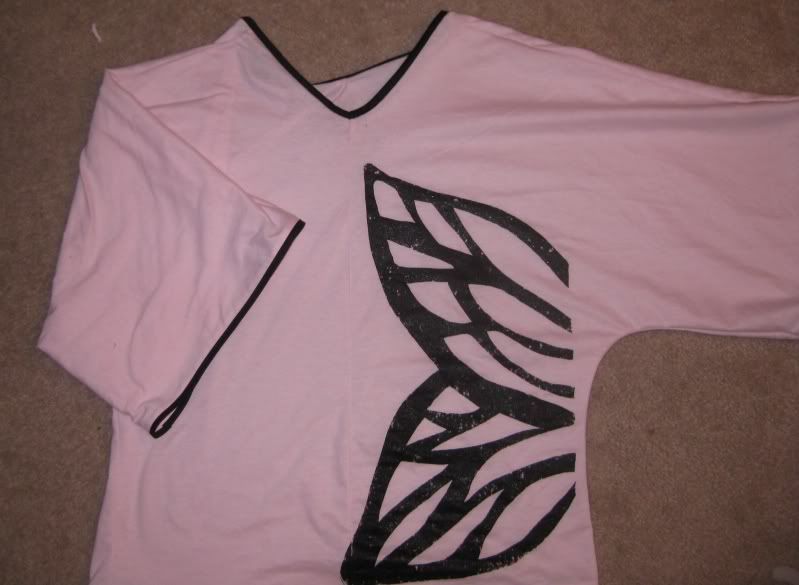
Wow! Yay! I wasn't done yet, I realized I needed something else to pull in the black since it was in such stark contrast to the light pink. I felt the shirt needed a little more black to it, to sort of tie it in together.
First I added bias trim to the bottom, arms, and neckline of the shirt. (This was the first time I ever sewed bias tape! I love it!)
Then I added a belt to it (in black) and the shirt was ready!
Sorry for the black sports bra in the picture, I didn't even occur to me until after I uploaded the pictures to my computer. All in All I loved how this turned out. I had some minor hiccups with the pattern I used which I won't go into but the top turned out wonderful. I can't wait now for what I can create with freezer paper. They make great stenciling material for shirts! :)
XOXOXO,
Lauren
First I began this project with making a kimono-style top. I had this light pink fabric which was a light-weight jersey knit fabric in my stash (so yay for earning a fabric point!).
Here goes me sewing something from scratch! I used Simplicity's Pattern # 2804 View A for my template.
Then to make my butterfly I sat down and sketched half a butterfly. This was actually sketched by me, I did not copy any particular photo or image. I drew it myself, that right there is amazing since I do not consider myself much of an artist.
I then cut out the butterfly using an exacto knife on my rotary cutting board. Now What I forgot was some of the inserts, I actually wanted to keep but got cut out when I prepped the stencil, so I had to re add them back in so I used the cut out portion to line everything up.

Now to simply keep the stencil in place just add the iron (no steam mode) and lightly touch the stencil. It immediately sticks! This is how I got the inner portions of the stencil to stay. :)
Now we are ready for paint! In one of the previous photos I added a thick piece of paper (I used a file folder) between the shirt layers so the paint wouldn't go through. Forgot to mention that earlier. I used a sponge to apply the paint, I wanted holes in the butterfly. I didn't want it to be too perfect. :)

Let the paint dry and remove the stencil.

Wow! Yay! I wasn't done yet, I realized I needed something else to pull in the black since it was in such stark contrast to the light pink. I felt the shirt needed a little more black to it, to sort of tie it in together.
First I added bias trim to the bottom, arms, and neckline of the shirt. (This was the first time I ever sewed bias tape! I love it!)
Then I added a belt to it (in black) and the shirt was ready!
Sorry for the black sports bra in the picture, I didn't even occur to me until after I uploaded the pictures to my computer. All in All I loved how this turned out. I had some minor hiccups with the pattern I used which I won't go into but the top turned out wonderful. I can't wait now for what I can create with freezer paper. They make great stenciling material for shirts! :)
XOXOXO,
Lauren
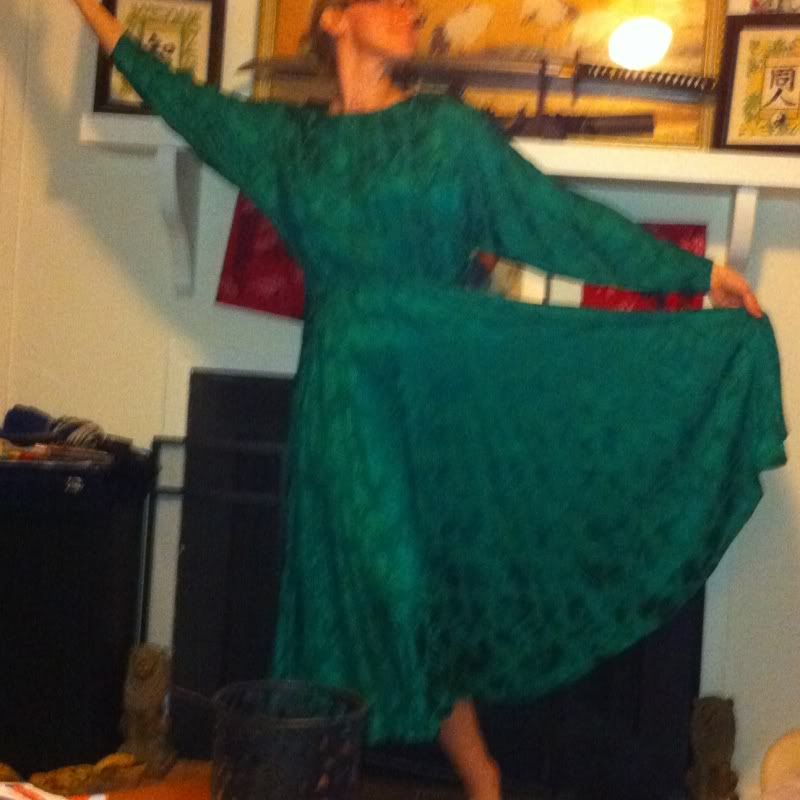
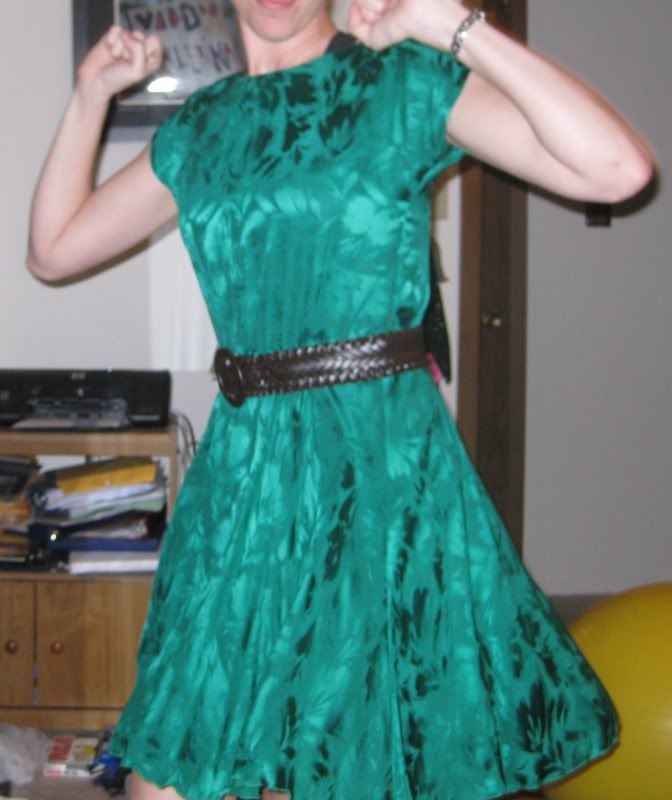
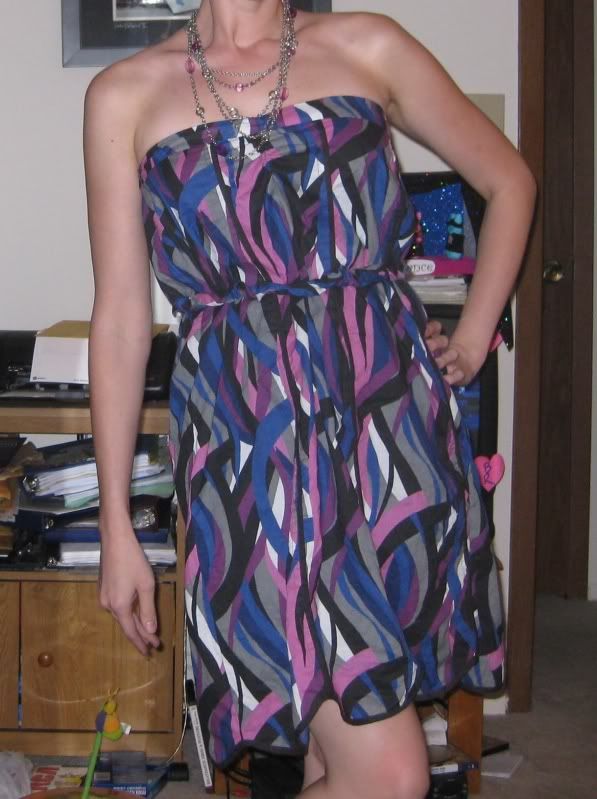
Green Monster Refashion!
It is the green monster dress! Rawr!!! I called this dress the green monster, not because I am a boston red sox fan (nope! i hate boston!!), but because it was green and it was as ugly as a monster! I was hoping that I could make it less of a monster.
It reminded me also of a liturgical dress. It was made here in mobile (Priscilla's fabrics) it was on the tag. Really all what I did was cut off the sleeves, take the dress a bit in on the top side, and serge the bottom to take up the hem.
Here is the end product!
Kind of has a retro feel to it but I really like it! I added a belt to finish up dress. And its no longer the green monster. It is just green :)
XOXOXO,
Lauren
It reminded me also of a liturgical dress. It was made here in mobile (Priscilla's fabrics) it was on the tag. Really all what I did was cut off the sleeves, take the dress a bit in on the top side, and serge the bottom to take up the hem.
Here is the end product!

Kind of has a retro feel to it but I really like it! I added a belt to finish up dress. And its no longer the green monster. It is just green :)
XOXOXO,
Lauren
Friday, May 13, 2011
Ahhhhhhhhh.....
All is right in the blogger world as blogger is now fixed! Wow did it take a long time to get back online or what? I did loose one of my posts, which I will be patient and give it the rest of the weekend to restore itself.
Today is Friday, and TGIF. It has been a long week with paper editing and figure editing. Luckily the first paper will go out. Ahhhh. Nice. Serenity. My brain is still a bit fried at the moment, hence why I have caught up on my blog tabs. I should now be caught up with the latest projects into the tabs.
A wonderful thing did happen of a result of my analytical editing, when I got home all I wanted to do was sew and I knew exactly what I wanted to do! The past 2 nights, I got 2 refashions done and I started another. Stay tuned, once I get my camera uploaded I will post. The first refashion was a skirt I turned into a dress. It was a 3XL! Its super cute. The second was a Laura Ashely like dress that is now a top. And the third one was the dress I called the green monster. It is all green and probably was a liturgical dress from the 90s. It amazes me what sometimes just taking up the hem and cutting off the sleeves does to a hideous dress! That one is almost done too! Stay tuned!
Also I am going to participate in this week's Iron Craft Challenge. The past 2 weeks were super easy but I never got my act together. This week I am determined! The challenge is tee time. So turn a drab tshirt into a fab one. And I have my idea. :) If it works out it will be awesome! Giddy. But seriously I can't draw!
Alright, almost time to leave here. It will be time to get sushi in a bit and I am super hungry! Oh yeah and Relay for Life tonight!
Wednesday, May 11, 2011
Skirt to Dress #2
Here is another refashion I did using a very large skirt.
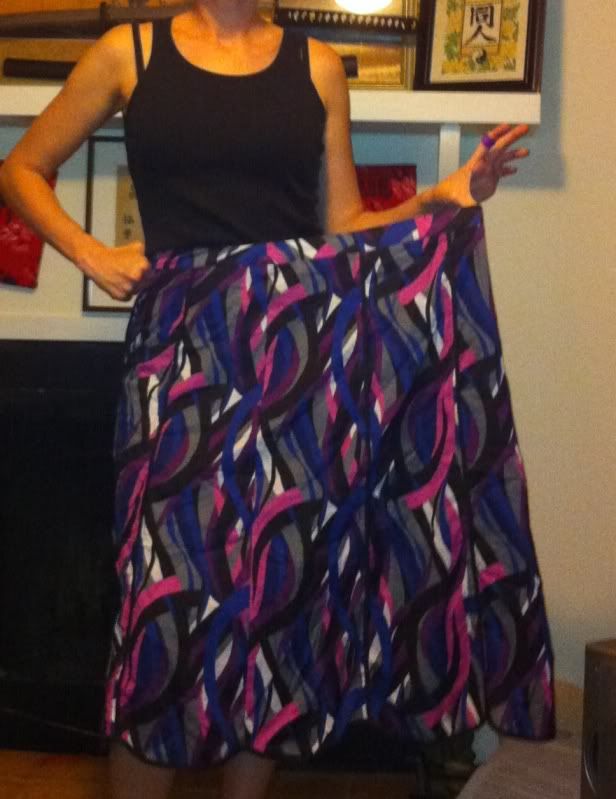
Actually it is a 3XL!! Another wonderful buy from the local thrift store for $0.99. I loved the fabric and the bias strip edging.
I decided to turn it into a dress again! I started with trying this skirt on inside out and like how I would wear it as a dress. I pinned it where it would need to be taken in (and a lot of fabric might I add!!)
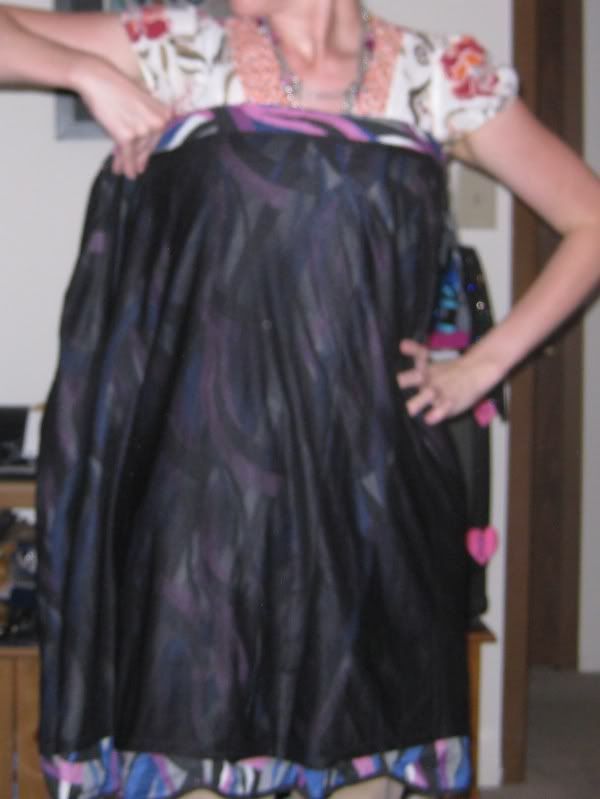
I then laid it down and went straight down the skirt with some pins.
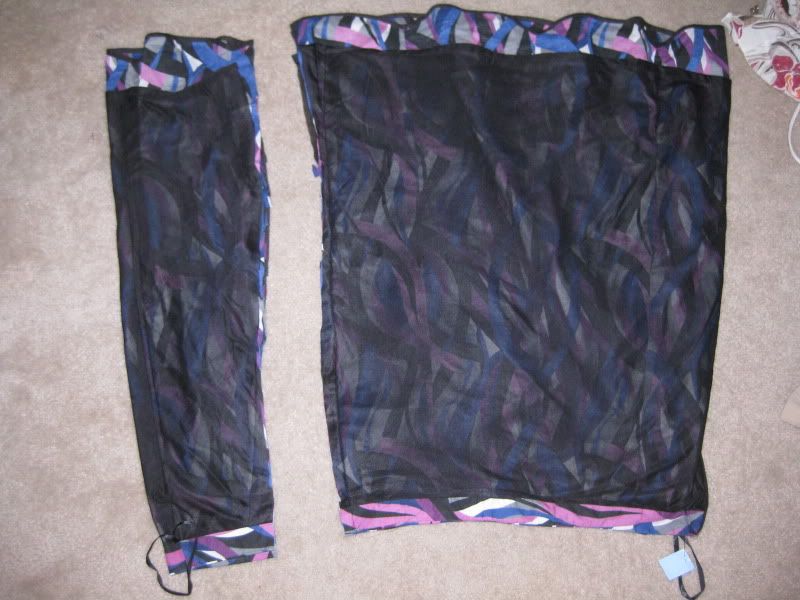
Then I sewed and cut off the excess fabric.
Next I wanted to add a pinch in the middle of the dress to make it less square. So I sewed on a piece of elastic to the center (while I was stretching it out).
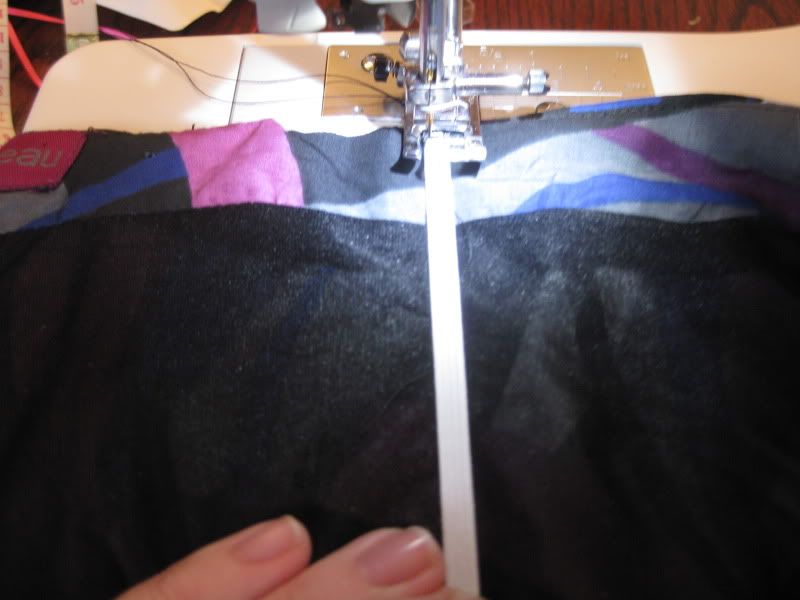
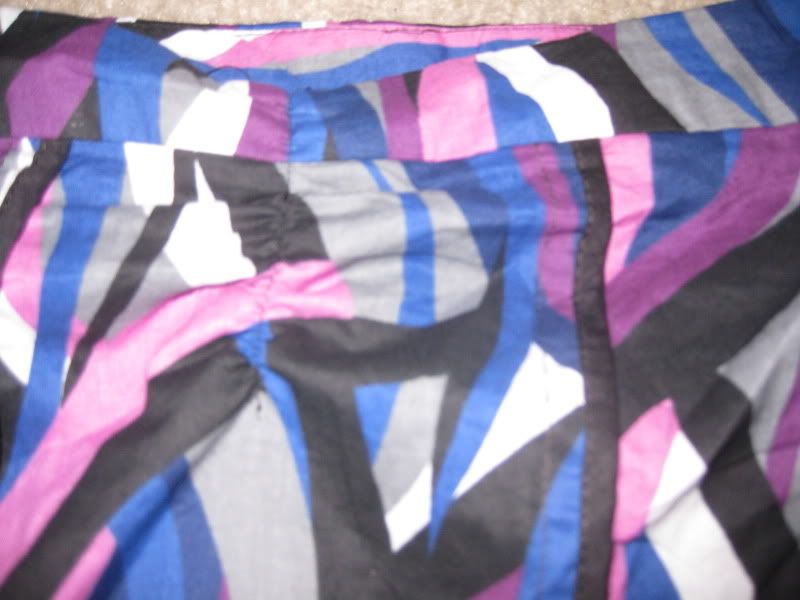
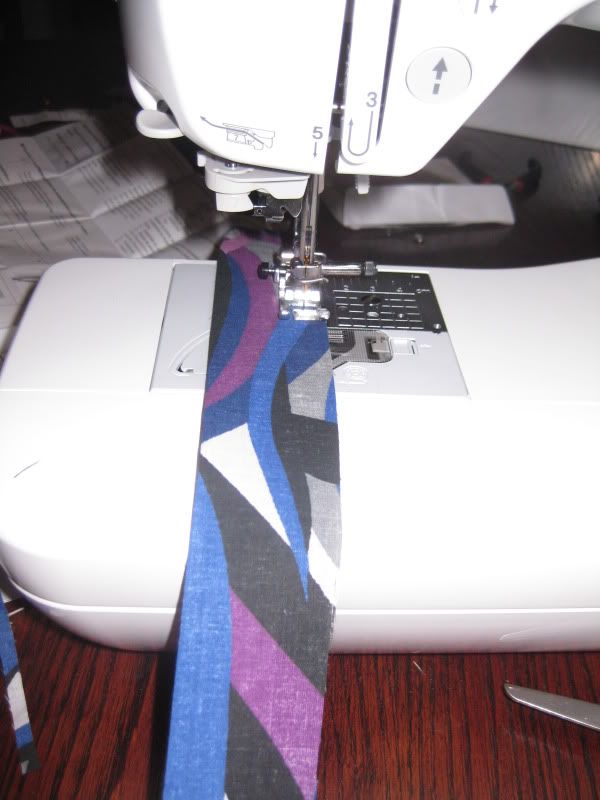
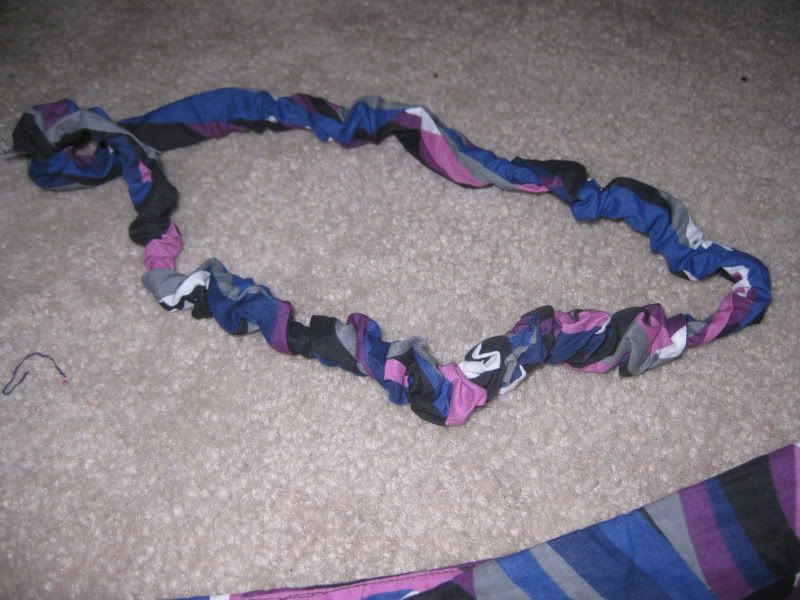
Next I made yet again another tube to create a belt for this dress. (longest part of the refashion!) I went for an elastic, stretchy belt for the dress. No ties.

Here's the final product. Love it! :)
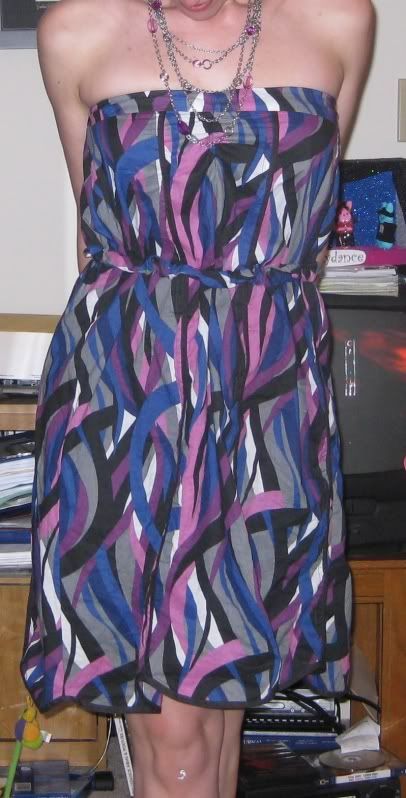

Oh and btw I kept the zipper in the skirt. I just made sure I did not sew it out of the dress!
Yay that was a fun and quick project to break up paper reviewing in the lab! Hopefully papers will go out soon! :) Oh and I am using the rest of the fabric to make rosettes and probably turn it into a necklace. :)
Cheers,
Lauren
Actually it is a 3XL!! Another wonderful buy from the local thrift store for $0.99. I loved the fabric and the bias strip edging.
I decided to turn it into a dress again! I started with trying this skirt on inside out and like how I would wear it as a dress. I pinned it where it would need to be taken in (and a lot of fabric might I add!!)
I then laid it down and went straight down the skirt with some pins.
Then I sewed and cut off the excess fabric.
Next I wanted to add a pinch in the middle of the dress to make it less square. So I sewed on a piece of elastic to the center (while I was stretching it out).
Next I made yet again another tube to create a belt for this dress. (longest part of the refashion!) I went for an elastic, stretchy belt for the dress. No ties.
Here's the final product. Love it! :)
Oh and btw I kept the zipper in the skirt. I just made sure I did not sew it out of the dress!
Yay that was a fun and quick project to break up paper reviewing in the lab! Hopefully papers will go out soon! :) Oh and I am using the rest of the fabric to make rosettes and probably turn it into a necklace. :)
Cheers,
Lauren
Tuesday, May 3, 2011
More baby bibs done!
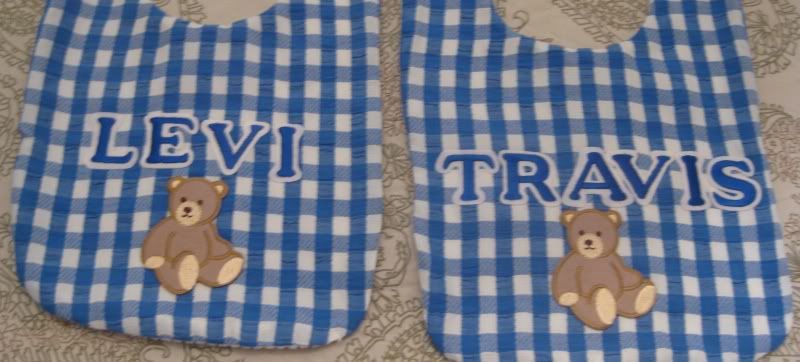
Finally finished the last bit of bibs for my cousin Judy's upcoming baby shower. She is going to have baby boy #2 (Travis) so I thought I would make something from the heart. Not to mention I got good at sewing the bibs for Randy and Lori.
I tried a sports theme for a few. Not exactly excited about the design but all in all they turned out good. Simple. Nothing fancy.
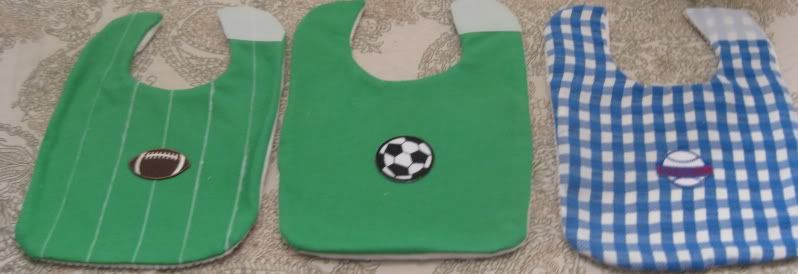
Then I made matching ones for the brothers with more of the blue/white checkered fabric. I actually love the way these look.
Of course we went for the velcro option for the bibs.
All in all, not bad with how they turned out. :) Simple and ready to get food on them!
Fabric Points added: 10 for the bibs and + 5 for the burp cloths!==== + 15 wahoo! will update the number soon! Yeah baby!
I tried a sports theme for a few. Not exactly excited about the design but all in all they turned out good. Simple. Nothing fancy.
Then I made matching ones for the brothers with more of the blue/white checkered fabric. I actually love the way these look.
Of course we went for the velcro option for the bibs.
All in all, not bad with how they turned out. :) Simple and ready to get food on them!
Fabric Points added: 10 for the bibs and + 5 for the burp cloths!==== + 15 wahoo! will update the number soon! Yeah baby!
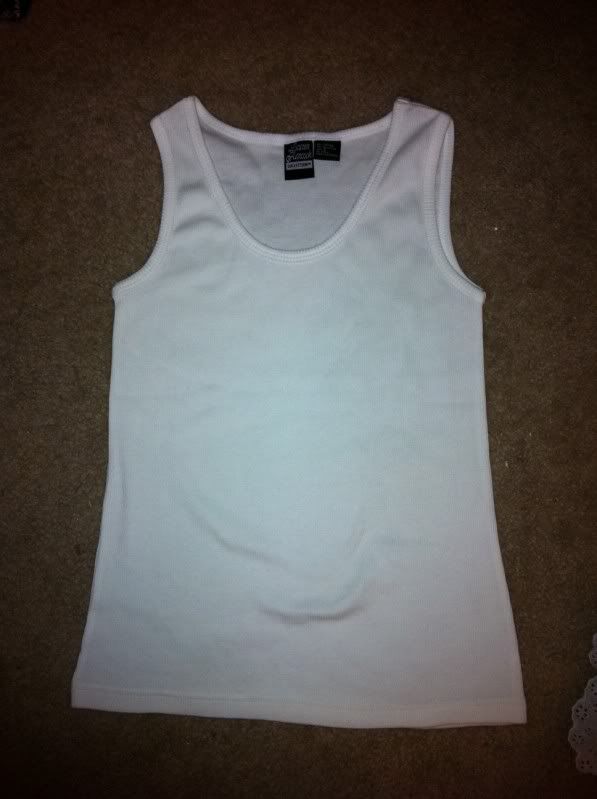
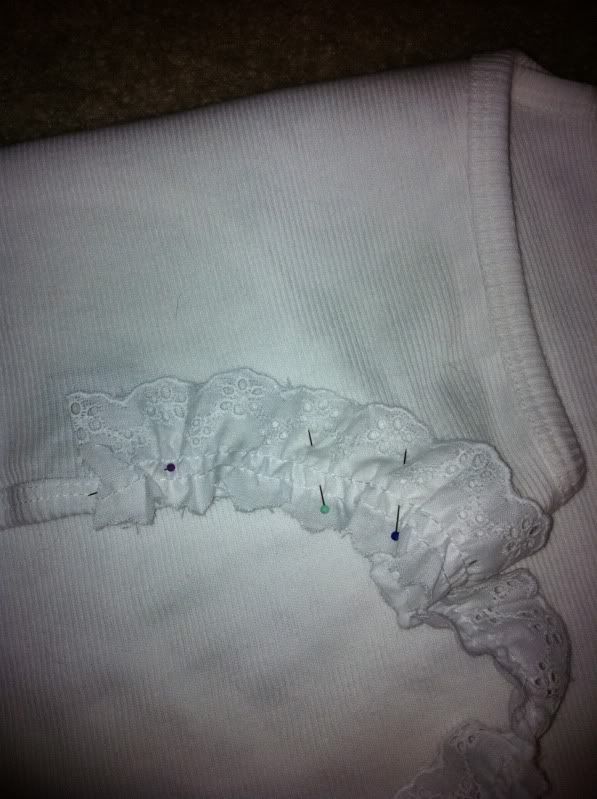
Eyelet lace tank top upgrade
I had purchased this great eyelet lace trim on clearance. But I did not know what to do with it. It came to me and its a simple upgrade/refashion.
First start with the tank top
Pin the eyeleet lace. I started on the back of the tank top. No one wants to see where I started.
Continue around the neckline.
I also pinned around the armholes too. Sew down.
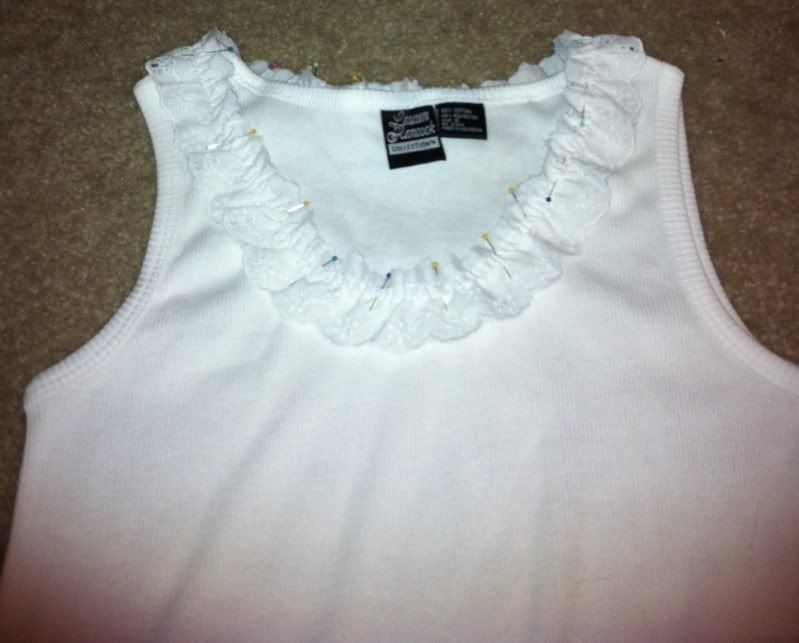
Here's the end product.
Pretty cute and pretty easy refashion. Super girl which I love! Yay!!
Hope this inspires you!
XOXOXO,
Lauren
First start with the tank top
Pin the eyeleet lace. I started on the back of the tank top. No one wants to see where I started.
Continue around the neckline.
I also pinned around the armholes too. Sew down.
Here's the end product.

Pretty cute and pretty easy refashion. Super girl which I love! Yay!!
Hope this inspires you!
XOXOXO,
Lauren
Monday, May 2, 2011
Gray Embellished Sweater
Ready for a blog bomb? :) Here we go!!
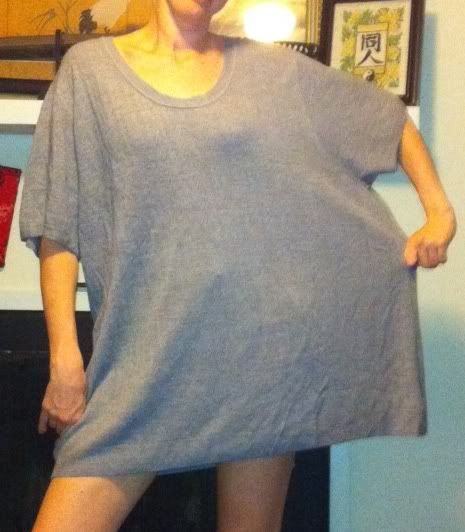
I first found this rather large gray sweater and just fell for the material. It is a light sweater material so perfect for a cool spring/summer evening. It still had the tag on it!!
Now what you can not tell is I am wearing a skirt under this sweater in this picture. Yes I am wearing a skirt! You just can not see it whatsoever. But the good news was it was in perfect condition!!!
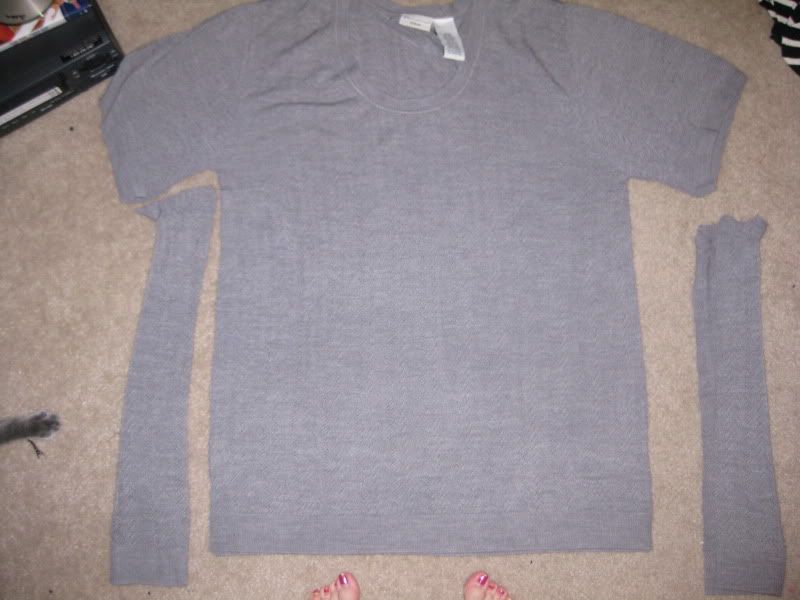
First thing first. Bring it in! I cheated and used a button down shirt I had handy to use as a guide.
Cut it off.
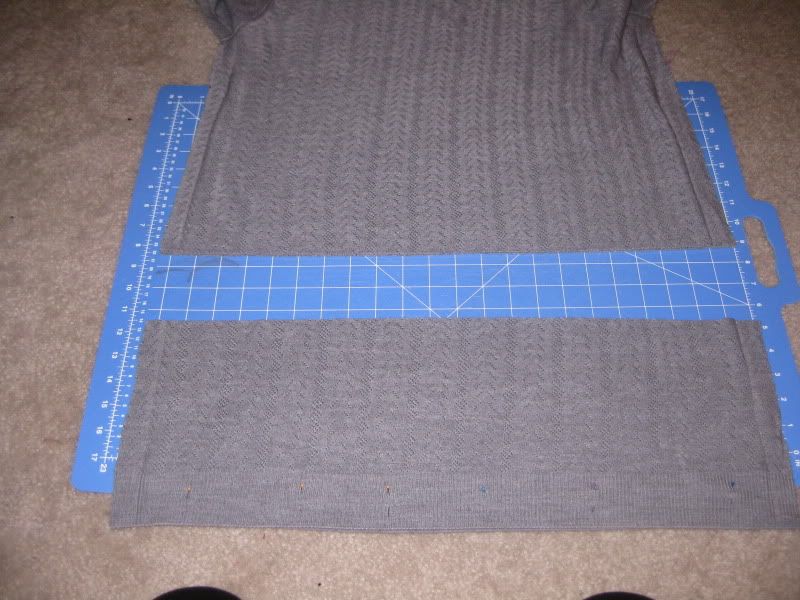
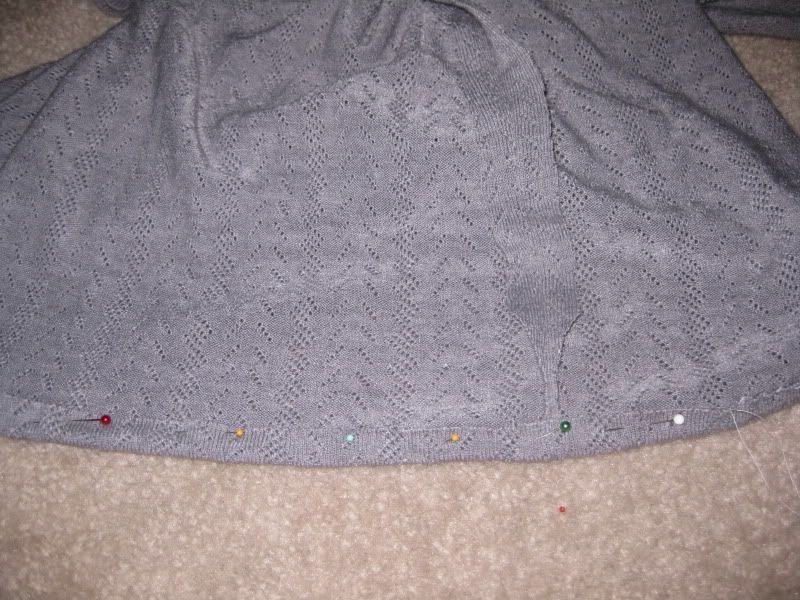
Sew it together! Now it is still super long. I took off 8 inches!!!
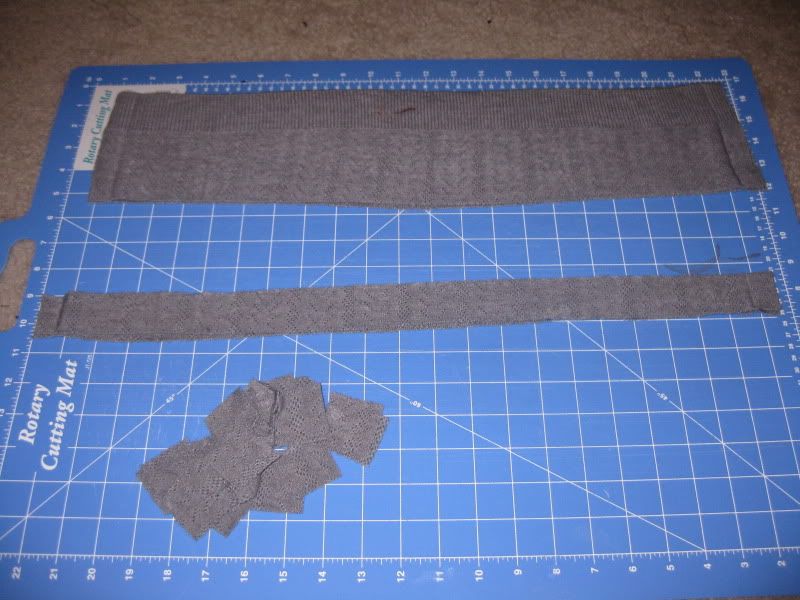
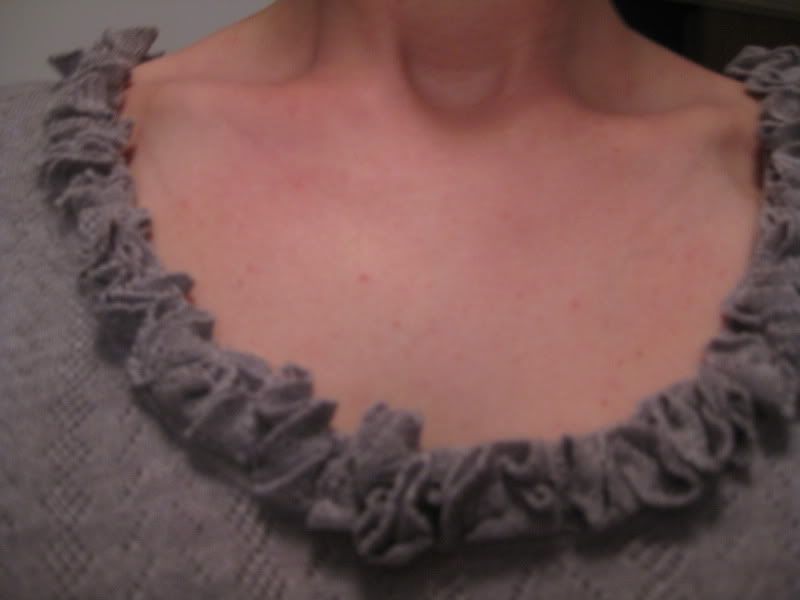
Then I began to cut circles to embellish the neck of this sweater, just like I did for my heart pin. Cut 1 1/2 inch strips, then into squares, which then went into circles. Pretty easy.
Next I started to bunch the circles and tack them down onto the sweater. This is actually easier than it seems. b/c you can put them and fold them whatever way you want to on the sweater. Also should one part start to unfold you can just tack down with another stitch. I started slightly behind the shoulders of the sweater and moved inward.
Closer view of the neckline
I continued the rest of the sweater. Almost done! I realized it needed something else to the bottom. I added row of elastic and did a blind hem sort of stitch.
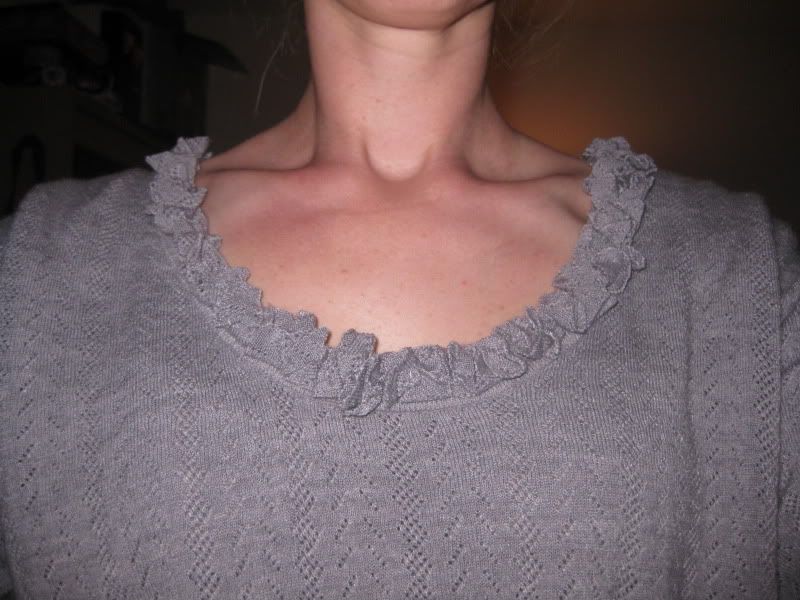
Done!
I just love the feel of this sweater. It is so light and airy. and I love the wide neckline. And it was a pretty easy refashion. It is a amazing what a little taking in and a little embellishing can do to a garment.
Until next time!
XOXOXO,
Lauren
I first found this rather large gray sweater and just fell for the material. It is a light sweater material so perfect for a cool spring/summer evening. It still had the tag on it!!
Now what you can not tell is I am wearing a skirt under this sweater in this picture. Yes I am wearing a skirt! You just can not see it whatsoever. But the good news was it was in perfect condition!!!
First thing first. Bring it in! I cheated and used a button down shirt I had handy to use as a guide.

Cut it off.
Sew it together! Now it is still super long. I took off 8 inches!!!
Then I began to cut circles to embellish the neck of this sweater, just like I did for my heart pin. Cut 1 1/2 inch strips, then into squares, which then went into circles. Pretty easy.
Next I started to bunch the circles and tack them down onto the sweater. This is actually easier than it seems. b/c you can put them and fold them whatever way you want to on the sweater. Also should one part start to unfold you can just tack down with another stitch. I started slightly behind the shoulders of the sweater and moved inward.
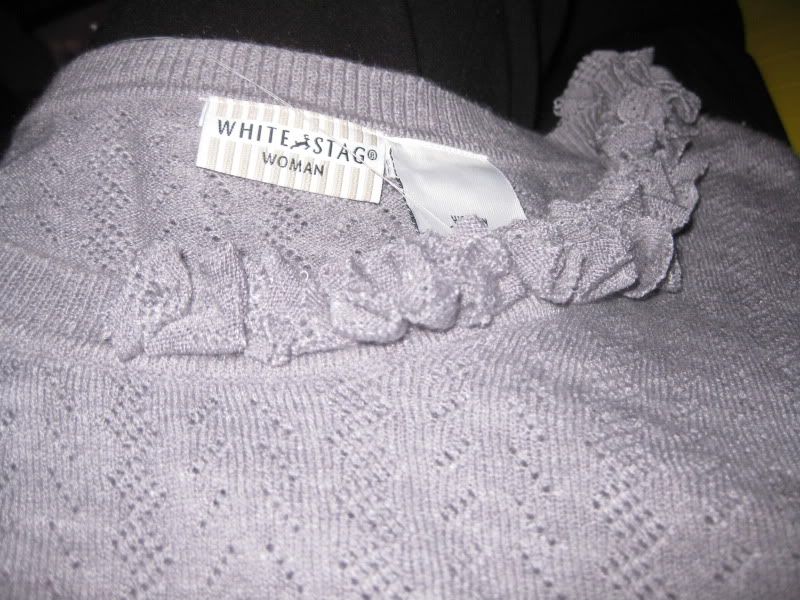
Closer view of the neckline
I continued the rest of the sweater. Almost done! I realized it needed something else to the bottom. I added row of elastic and did a blind hem sort of stitch.
Done!
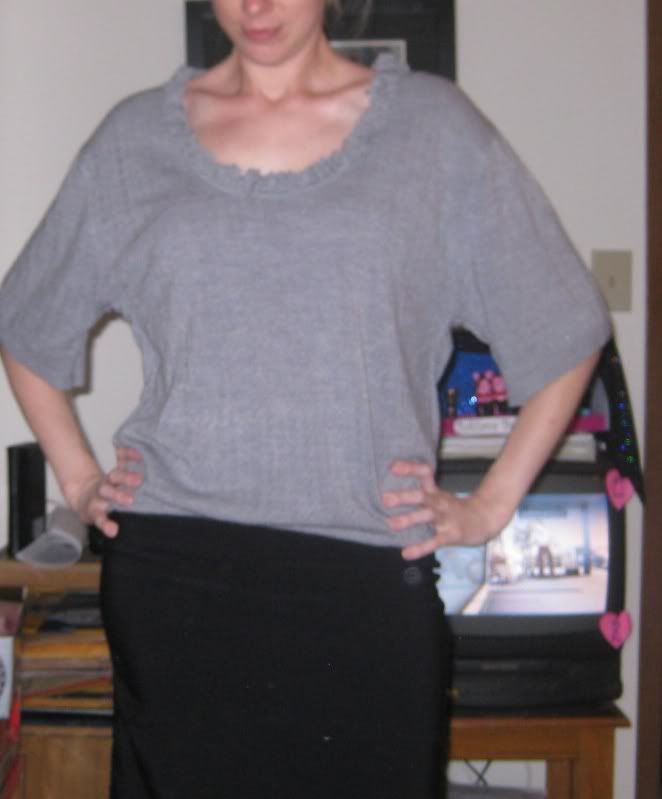
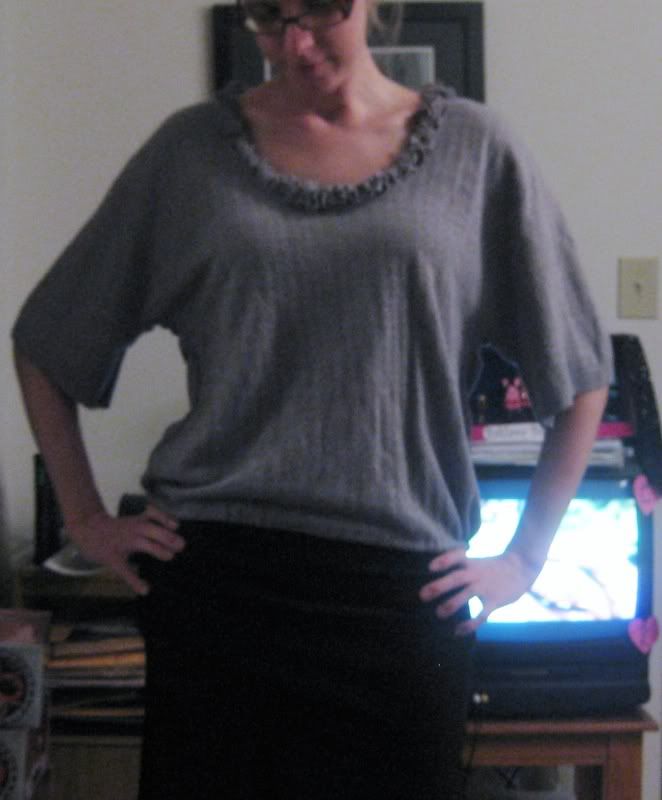
I just love the feel of this sweater. It is so light and airy. and I love the wide neckline. And it was a pretty easy refashion. It is a amazing what a little taking in and a little embellishing can do to a garment.
Until next time!
XOXOXO,
Lauren
Subscribe to:
Posts (Atom)